


Contact chef's hat
131 Cecil St
South Melbourne
Ph: +61 3 9682 1441
Or complete the provided form to contact us via email
Our Trading Hours are:
Monday- Friday: 9am to 5.30pm
Saturday: 9am to 4pm
Sunday: 10am to 4pm
CLOSED Public Holidays


-
Frequently Asked Questions
Got a question? You may find the answer here.
-
Chef's Hat Finance
We offer a range of finance solutions to help you get the equipment you need - without the upfront pressure.
-
Delivery Information
Fast, reliable delivery across Australia, find out more here.
-
Catalogues
Browse and download catalogues from the biggest brands in hospitality.
-
Careers
Join the Chef's Hat family.
-
Company Profile
Discover why thousands of customers Australia wide trust Chef's Hat as their hospitality partner.
-
Blog
Stay informed, sharpen your skills and get inspired.
-
Trade Accounts
Apply now to get the tools, support and trade pricing to keep your venue running smoothly.
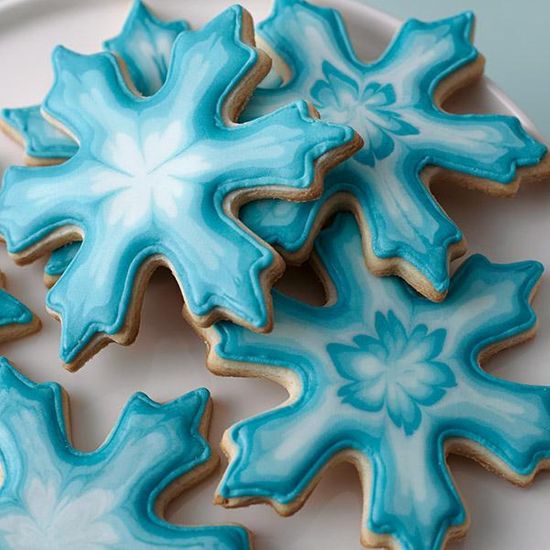
Recipe - Patterned Snowflake Cookies
 |
|
|
Ingredients
|
Tools
|
Step 1Preheat oven to 180ºC. Step 2In large bowl, beat butter and sugar with electric mixer until light and fluffy. Beat in egg and extracts. Mix flour, baking powder and salt; add to butter mixture 1 cup at a time, mixing after each addition. Do not chill dough. Divide dough into 2 balls. Step 3On floured surface, roll each ball into a circle approximately 30cm. diameter x 3mm thick. Dip Snowflake cookie cutter in flour before each use. Bake cookies on ungreased cookie sheet 8-11 minutes or until cookies are lightly browned. Cool Cookies. Step 2Decorate light center cookies. Divide blue icing into four portions. Tint four shades of blue from light to dark. Reserve some full-strength icing in darkest shade. Thin remaining icings, separately, according to package directions. Use tip 3, a pastry bag and full-strength dark blue icing to outline cookies. Use tip 3, a pastry bag, and thinned icing in darkest shade to pipe an outline next to first outline. Repeat with thinned icing in second darkest shade, second lightest shade and lightest shade of icing. Immediately use a toothpick to drag icing from snowflake arms toward center of cookie. Let cookies dry overnight. Reserve remaining icing. Step 3Decorate dark center cookies. You will outline cookies as for light center cookies, but you will add a second group of outlines from darkest to lightest to create the darker center design. After completing the lightest outline in the first group, start the second group with darkest thinned icing next to the lightest outline. When both groups are complete, immediately use toothpick to drag icing from snowflake arms toward center of cookie. Let cookies dry overnight. |
|
| Click here to view more from the Wilton Blog | |